
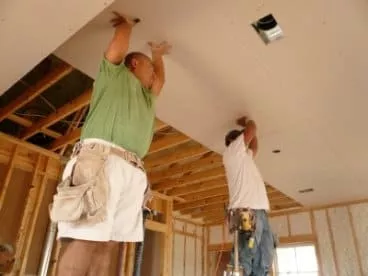
Drywall ceiling installationis really one of the most difficult processes in the process of hanging drywall. This is the point you can begin your transformation since your ceiling will be the first thing that you hang. Along the way we will offer you some tips to ease this process to make it seem less overwhelming.
The reason drywall ceilings get such a bad rap is because of the cumbersomeness of lifting the 8 or 12 ft sheets above your head into place. There are several tools that you can find on theDrywall Toolspage that make this process far less agonizing.
The first is adrywall jackwhich we highly recommend to drywall ceiling installation. These are fairly expensive to purchase for personal use, but can generally be found through a tool and equipment rental business.
Below is a list of all the tools you will need to get started.
Stop!Before you even begin the work, be certain that you have gone through ourdrywall preparationpage. This will walk you through the entire drywall preparation process. Also, check out ourdrywall installationpage for tips on safety.
Necessary Drywall Materials
- Drywall
- Drywall Screws
Necessary Drywall Tools
- Tape Measure
- Pencil
- Razor Knife
- Circle Cutter (or Keyhole Saw for cutting holes for light fixtures)
- Electric Drill
- Dimpler Bit for Drill (optional but recommended)
- Drywall Square
- Construction Adhesive
- Drywall Lift (optional but strongly recommended)
A note before you begin:
If you plan on installing a ceiling fan in your newly drywalled room make sure that support studs are installed around where the wiring will come down through the ceiling. Ceiling fans are heavier and need extra support. The best time to place studs in for support is when the drywall is down.
A second note before you begin: Do a quick check to see if your walls are square. You can do this using the “3-4-5” rule. Measure 3’ out from one corner of the wall and make a mark. Measure 4’ out from the same corner on adjacent wall and make a mark. Now measure the distance between the marks. It should come to exactly 5’.if the corner is square.
Don’t get worried if your ceiling corners are a little off square. This is fairly common, especially on older houses. Too often people try to force the sheet up. Remember that it does not have to fit the corner absolutely perfect, since the drywall on your walls will butt up into your drywall ceiling, allowing for some leniency.
Step One – Hanging the Initial Piece
Now that we have covered the basics let’s get the first sheet up. Start in the corner of your room. When attaching ceilings we recommend gluing the drywall to the studs along with screwing. This prevents helps to prevent sagging.
First, apply a modest amount of construction adhesive to the outer faces of your ceiling studs.
Raise the sheet up with a drywall lift, if you have one available (they are well worth the rental price). This will keep you (and probably several helpers) from needing to hold a heavy piece of drywall up over your head for several minutes at a time.
If your corners are not square, it may require some extra cutting or “shaving” of the drywall to make the piece fit well.
Mark the placement of your studs with a pencil mark at each end of the drywall. Now, once you have the drywall placed correctly, attach it to the studs with drywall screws, five or six evenly spaced screws per stud.
These screws should be spaced 7-9” apart on the studs. Don’t screw directly into the edge of the drywall. Just as driving a nail into the edge of a board may split the wood, driving a screw too close to the edge of the drywall may cause the plaster to crumble. Place all screws approximately 3/8 – 1/2” in from the edge.
Step Two – Hanging Your Drywall Ceiling
Now that you have your initial piece of drywall hung, you will begin the process of measuring and cutting your drywall ceiling sheets. Measure out from the end of your first sheet of drywall to the end of the ceiling.
If this is >8’, hang another full sheet. If not, measure out the distance from the end of the drywall. Then duplicate that measurement on your next piece of drywall. Mark the measurement lightly with a pencil and a drywall square.
To cut drywall, score the surface (along the line you’ve marked) with a razor knife. You may need to go over the cut several times until you’ve scored a fairly deep cut in the face of the sheet.
Now, bend the sheet of drywall along the scored cut. It should “break” cleanly and evenly along the cut. Once you have bent the sheet back at a ninety degree angle, cut the paper on the back of the drywall with your razor knife.
Repeat this process as you move along the wall, skipping back and forth between step four and step three. Measure and cut, then hang, each individual piece.
Be sure to butt each piece of drywall tightly together. You want the factory tapered edges of the drywall to meet whenever possible. This will make the finishing step much simpler.
Continue the process cutting, gluing and attaching fasteners until the ceiling is finished. You should place around five screws per stud to secure the sheet.
Unlike with walls we recommend fully fastening the ceiling before moving onto the next sheet.
Continue to make marks with a pencil at the ends of each sheet marking the placement of studs. This will allow you to find the stud beneath the drywall with your screws.
An Aside – Ceiling Fixtures
When working with ceiling fixtures make sure that the power is off and measure the distance from the sheet to both edges of the fixture as well as from the side. Marking the location of the light fixture, you will then use a keyhole saw or circle cutter to cut out the space for your electrical box.
Step Four – The Final Check
Before moving on to the taping and mudding steps, double check to ensure that all your screws are driven just below the surface of the drywall, creating a dimple in the paper.
If any of the screws have broken the surface of the paper, drive another screw to the correct depth just above or below it. Don’t sweat any mistakes that broke through the paper. These are easily covered up later on.
Congratulations! You have completed hanging a drywall ceiling.
Check out our pages on taping, mudding, and finishing drywall below.
Or see our page onceiling drywall texture.